Exercise 7 - Slash commands in GitHub Copilot CLI
Like any good CLI tool, GitHub Copilot CLI includes many slash commands to interact with it. These commands expose advanced functionality, “behind-the-scenes” information, or additional configuration options. You’ve already explored a couple with /clear to clear context and /mcp to inspect MCP servers. Let’s explore a couple of other powerful ones, including /context, /model, /share, and /delegate.
Scenario
Section titled “Scenario”You’ve wrapped the core CLI flows. Now let’s look at a few additional capabilities — sharing sessions, switching models, and delegating tasks to Copilot cloud agent.
In this exercise you will use:
/shareto create a GitHub gist to share your session with the team./contextto see the context Copilot CLI is currently using./modelto explore the list of available models and select a new one if you so desire./delegateto optionally hand off a task to cloud agent. This requires cloud agent, available on Copilot Student, Pro, Pro+, Business, or Enterprise — every plan except Copilot Free.
Sharing a session
Section titled “Sharing a session”Using any tool, including an AI tool, is a skill. Working together as a team, sharing learnings with each other, is the best way to help improve everyone’s experience and generate higher quality code. To support this, Copilot CLI provides a /share command. The /share command can generate a markdown file or GitHub gist with the details of the session, including the prompts used and logic Copilot followed.
Let’s create a GitHub gist we could share with our team.
-
Return to your codespace. If you closed it, navigate to your repository on GitHub.com, select Code > Codespaces, then reopen your existing codespace.
-
Return to your open Copilot CLI session. If the terminal is closed or you exited Copilot CLI, open a terminal by selecting Ctrl+`, then start it from the repository root by running
copilot --yolo --enable-all-github-mcp-tools. Trust the project folder if prompted, then run/modeland select Auto. -
In the prompt window for Copilot CLI, send the following command:
/share gist -
In just a couple of moments, Copilot will create a gist and display the link.
-
Copy the link text.
-
In a new browser tab, paste the link to explore the gist. Note how the gist highlights the prompts sent, skills and agents used, Copilot’s thought process, and even the code and results from locally run commands.
The gists and markdown files generated by /share can be used for documentation purposes of how code was generated, or to share with your team about how certain actions were performed that generated the desired results from Copilot.
Exploring Copilot CLI’s context
Section titled “Exploring Copilot CLI’s context”When working on larger or more complex tasks you may bump into the maximum context window for the model. The exact size of the window will vary based on the model being used and the version of Copilot CLI. When the context window is maxed out, Copilot CLI will automatically compact it, summarizing information and removing anything it deems isn’t relevant to the current task. You can both see the current state of the context and manually compact the context by using slash commands. Let’s explore the context window.
-
In the prompt window for Copilot CLI, send the following command:
/context -
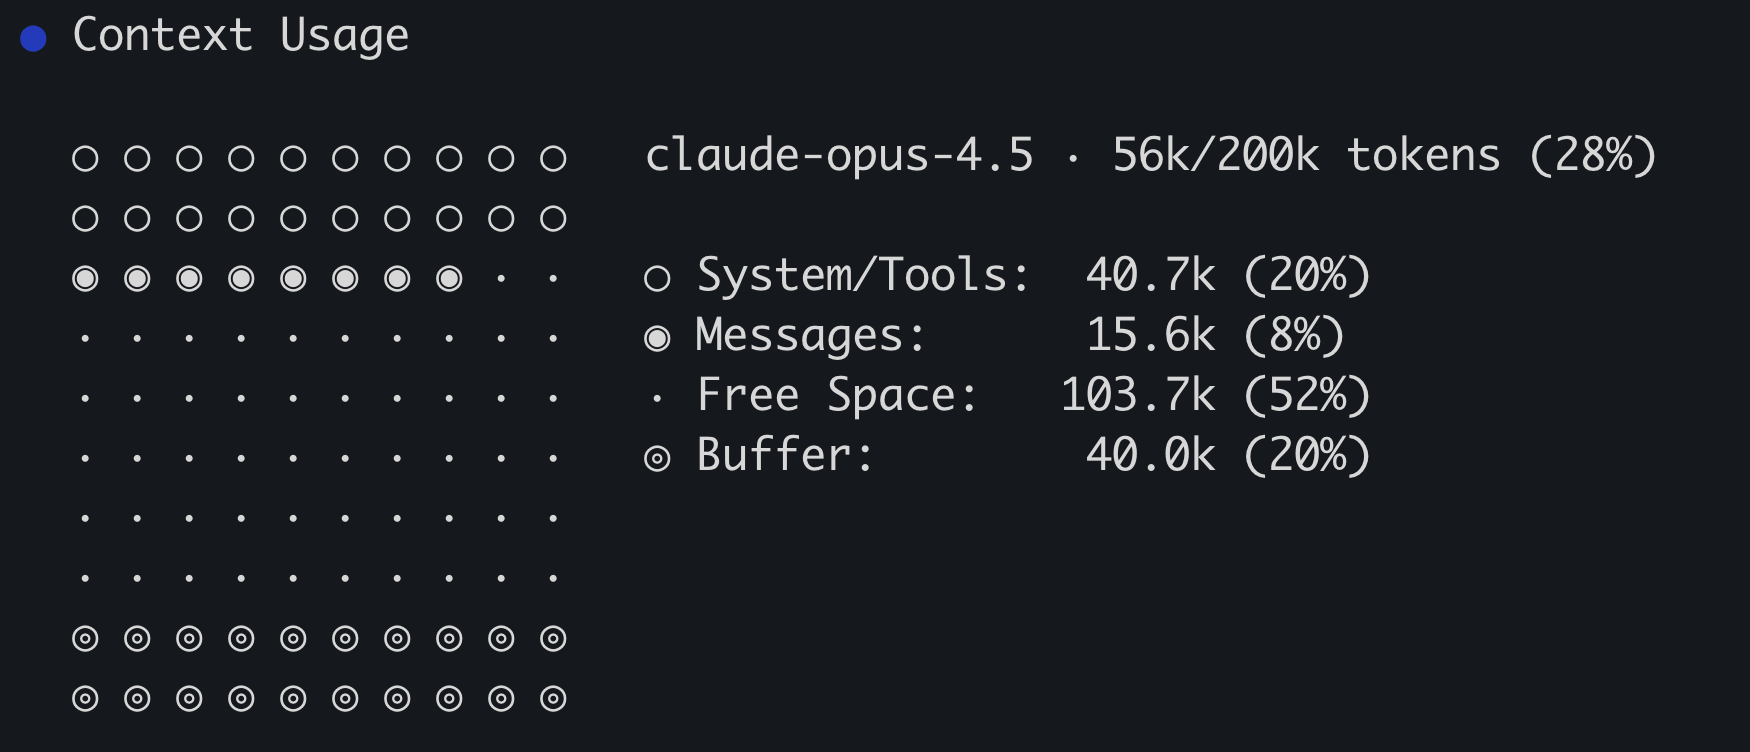
In just a couple of moments, Copilot CLI will generate a visual representation of its current context:
-
Note the model displayed (which may be different than the one in the image), and the current percentage of tokens used. The rest of the information highlights:
Title Description System/Tools Instructions files, file contents and tool definitions Messages Conversation history between you and Copilot Buffer Reserved space by Copilot CLI for generating responses Free space Remaining free space -
Compact the conversation history by sending the following slash command to Copilot CLI:
/compact -
Once completed, send the following command to display the current context stats again:
/context -
Note the change in context. There might not be a drastic change as the context window is likely relatively small at the moment.
Best practices with context
Section titled “Best practices with context”In most sessions with Copilot context will be managed efficiently by Copilot itself without any specific guidance. However, there may be instances when you decide to manually instruct Copilot to either clear or compact its history:
- If you are changing to a different part of the application, or to an unrelated task, you can use
/clearto start new to avoid confusing Copilot with older, unrelated context. - If you are approaching the maximum context window, you can manually
/compactyour context to control when it happens.
Choosing your model
Section titled “Choosing your model”Different models have different strengths, and different developers have different preferences. Copilot CLI allows you to list and select the model you wish to use!
-
Display the list of models by sending the following slash command to Copilot CLI:
/model -
Note the list of models. Each model will have both its name and cost-per-request modifier listed next to it.
-
If you wish, select a new model! Or select Esc to exit the model list.
Delegating to cloud agent (optional)
Section titled “Delegating to cloud agent (optional)”There are times when you want to keep working in your terminal but hand off a longer-running task to Copilot cloud agent. The /delegate command sends the current Copilot CLI session to GitHub.com, where cloud agent picks it up, works asynchronously, and opens a pull request when done.
-
Clear the current session first so accumulated workshop context isn’t delegated:
/clear -
Send a small, well-scoped prompt. For example, you could delegate the stretch-goal pagination from your backlog:
Implement pagination on the game list page so it shows a fixed number of games per page with Previous and Next controls, and add tests. -
Send the following slash command to hand the session to cloud agent, and confirm the prompt you want to delegate:
/delegate -
Open Copilot agents in a browser to monitor progress.
-
You don’t need to wait for the pull request to complete in this harness; you can return to it later. If you want to dig deeper into managing asynchronous agent work, continue with the Cloud agent harness.
Summary and next steps
Section titled “Summary and next steps”Using slash commands in Copilot CLI allows you to configure it, share sessions, and get internal information about how Copilot’s working. In this lesson you used or explored:
/shareto create a GitHub gist to share your session with the team./contextto see the context Copilot CLI is currently using./modelto explore the list of available models and select a new one if you so desire.- Learned about
/delegateas an optional bridge to cloud agent.
There are of course more slash commands available, and more to explore with Copilot CLI! Let’s close out our journey by reviewing what we’ve learned and some next steps to continue learning.